Working with external data
Learn how to retrieve and use data from external systems during the conversation.
Use of external data
With NativeChat you can use data from external systems to:
- get user information before conversation start - to customize the experience based on what you already know
- for reply suggestions - give users a list of predefined answers / options they can pick from.
- sending / requesting data via a webhook
- validating user input
Making a request to a REST API endpoint
Configuring a data source
Here is how to configure a data source using the data-source property:
{
  "data-source": {
    "endpoint": "https://yourwebsite.com/GetDoctors",
    "method": "GET",
    "headers": {
      "Authorization":"Bearer EuebDyjsd23PS20zY51ULlJSecFUenAkWN"
    },
    "payload": {
      "DepartmentId": "1"
    },
    "selector": "$.Result[:]"
  }
}
The available properties for data-source are:
| Name | Type | Required | Description |
|---|---|---|---|
endpoint |
string | Yes | Default: none The URL of your API endpoint. |
method |
string | Yes | Default: none The request method. |
headers |
object | No | Default: none The request headers. |
payload |
object | No | Default: none The request body. |
response |
string | No | Default: body body | full If you need information not only from the response body, but also from the response headers or status code, use the full option. |
selector |
object | No | Default: none JSONPath expression to extract data from the HTTP response. We recommend you to create your JSONPath expressions using the JSONPath Online Evaluator. |
The bot expects the result from the web service to return an array.
selector property within the data-source to define a JSONPath expression to extract the array. Reply suggestions
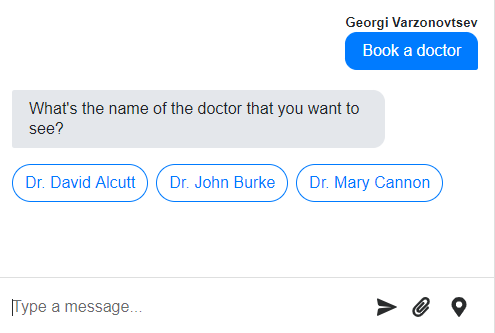
For every question step in a conversation you can provide users with reply suggestions. These are presented as a list of predefined answers users can pick from. This can help them understand what they are being asked for and also limits the possibility of error when entering free text replies.
Check the reply suggestions article for more information.
Here is an example of how to display a list with quick reply buttons. The text of each button is the name of a doctor. The list data is requested from the internal hospital system via a webhook.
{
  "steps": [
    {
      "type": "question",
      "entity": "selectedDoctor",
      "entity-type": "Doctor",
      "messages": [
        "What's the name of the doctor that you want to see?"
      ],
      "display": {
        "type": "quick-reply",
        "data-source": {
          "endpoint": "https://yourwebsite.com/GetDoctors",
          "method": "GET",
          "selector": "$.Result[:]"
        },
        "template": "{{Title}} {{FirstName}} {{LastName}}"
      }
    }
  ]
}
Webhook requests
A webhook step is used to make a request to a REST API.
Use it at any point during a conversation to get or send data. You can also store the result of a webhook as an entity in the bot memory and use it in the next steps of the flow.
Extracting data from an API endpoint and using it in the cognitive flow
During a conversation you can make a request to your API to get information that would be needed for completing the flow.
{
  "type": "webhook",
  "entity": "toDoList",
  "data-source": {
    "endpoint": "https://mycustomwebsite.com/Tasks",
    "method": "GET",
    "headers": {
      "Authorization": "Bearer EuebDyjsd23PS20zY51ULlJSecFUenAkWN"
    },
    "payload": {
      "User": "{{user.Id}}"
    }
  }
}
That request can return the following result:
{
  "usernameId": {
    "Tasks": [
      {
        "Subject": "Meet John",
        "StartDateTime": "2020-10-06T07:00:00+0000",
        "Duration": "0:30"
      },
      {
       "Subject": "Leave for client meeting",
       "StartDateTime": "2020-10-06T07:00:00+0000",
       "Duration": "0:30"
     }
    ],
    "ContactInfo":[]
  }
}
Then in the next steps you can use the data stored in the toDoList entity for example when showing a list with quick replies or a carousel.
{
  "steps": [
    {
      "type": "question",
      "entity": "selectedTask",
      "entity-type": "Task",
      "messages": [
        "Pick a task:"
      ],
      "display": {
        "type": "quick-reply",
        "data-source": {
          "entity": "webhookData",
          "selector": "$.Tasks[:]"
        },
        "template": "{{StartDatetime}} {{Subject}}"
      }
    }
  ]
}
Since the toDoList entity is an object, you have to use a selector to get the Tasks array from it. After that using the template property you can format the text of the quick reply options.
Sending data to an API endpoint
This example shows how you can send the information gathered during an appointment booking conversation to a REST API endpoint. Notice how in the payload we can use all the entities collected so far.
{
  "type": "webhook",
  "entity": "appointment",
  "data-source": {
    "endpoint": "https://mycustomwebsite.com/Appointments",
    "method": "POST",
    "headers": {
      "Authorization": "Bearer EuebDyjsd23PS20zY51ULlJSecFUenAkWN"
    },
    "payload": {
      "CabinetID": "1",
      "DoctorID": "{{selectedDoctor.DoctorID}}",
      "PatientIdentNumber": "{{contactNumber}}",
      "PatientMobile": "{{contactPhone}}",
      "PatientName": "{{contactName}}",
      "User": "{{user.Id}}"
    }
  }
}
For validation
Steps that have validation reaction can make a request to a REST API endpoint to check if the user input is valid. For example, when the user types a company or person name, you can check if it matches an entry in your database.
One of the ways to validate user input is by using an external API endpoint call.
{
  "type": "question",
  "entity": "pinCode",
  "entity-type": "PinCode",
  "messages": [
    "Please type your 5 digit pin code number."
  ],
  "reactions": {
    "validations": [
      {
        "type": "custom",
        "parameters": {
          "data-source": {
            "endpoint": "https://some.validation.service/checkPinCode?pinCodeToValidate={{$encodeURI pinCode}}"
          },
          "condition": "{{$eq _response 'valid'}}"
        },
        "error-message": [
          "The pin code number is not valid. Please make sure to enter a valid pin code number that hasn't expired."
        ]
      }
    ]
  }
}
If response property of data-source is additionally set to full, the other parts of the response could be used for the validation, for example:
"condition": "{{$eq _response.status 200}}"
Working with the response
By default, only the response body is stored when a web service is called. Additionally, if the result is in JSON format, the selector (if set) is applied and then an object with the corresponding properties is created.
For example, let’s assume the following data source:
{
  "type": "webhook",
  "entity": "doctors",
  "data-source": {
    "endpoint": "https://yourwebsite.com/GetDoctors",
    "method": "POST",
    "headers": {
      "Authorization": "Bearer EuebDyjsd23PS20zY51ULlJSecFUenAkWN"
    }
  }
}
which calls a web service returning the following data:
[
  {
    "LastName": "Cannon",
    "FirstName": "Mary"
  },
  {
    "LastName": "Burke",
    "FirstName": "John"
  }
]
In this case, the last name of the first doctor could be used like this in a further step:
{
  "type": "message",
  "messages": [
    "{{doctors.[0].LastName}}"
  ]
}
as the JSON from the response body is stored in the doctors entity as an array of objects.
If you need other parts of the response than the body itself, like status code or headers, you can set the response property to full. For example, if the same webhook is called with:
{
  "type": "webhook",
  "entity": "fullResponse",
  "data-source": {
    "endpoint": "https://yourwebsite.com/GetDoctors",
    "method": "POST",
    "headers": {
      "Authorization": "Bearer EuebDyjsd23PS20zY51ULlJSecFUenAkWN"
    },
    "response": "full"
}
the following will be stored in the fullResponse entity as an object:
{
  "status": 200,
  "statusText": "OK",
  "headers": {
    "content-type": [
      "application/json"
    ],
    "content-length": [
      "271"
    ],
    "connection": [
      "close"
    ],
    "date": [
      "Wed, 07 Oct 2020 05:46:31 GMT"
    ]
  },
  "body": [
    {
      "LastName": "Cannon",
      "FirstName": "Mary"
    },
    {
      "LastName": "Burke",
      "FirstName": "John"
    }
  ]
}
and we can the access the different parts of the response in the subsequent steps:
{
  "type": "message",
  "messages": [
      [
        "status: {{fullResponse.status}}",
        "statusText: {{fullResponse.statusText}}",
        "content-type: {{fullResponse.headers.content-type.[0]}}",
        "body: {{$json fullResponse.body}}"
      ]
  ]
}
where the following properties are available:
statuscontains the HTTP response status code, e.g.200.statusTextcontains HTTP response status text, e.g.OK.headerscontains object with properties for each of the HTTP response headers. Each of these properties contains an array of values for this header, e.gheaders.content-typewill return an array with the values of theContent-Typeheader, like[ "application/json" ].bodycontains the response body. If the body is in JSON format,bodycontains directly the corresponding parsed objects.
response option value.
When the default "response": "body" option is used and the webhook returns error (something with status code outside of the 200-299 range), an error is thrown and the execution of the cognitive flow stops.
Contrary, when "response": "full" is used, the full response (including the error code and status text) are just stored and the execution continues.Setting user context before conversation start
When using the web chat widget or the REST channel you can store information about the user in the bot memory. These could be names and emails, or authentication tokens, or CRM customer profile data.
Check the web channel publishing article for more information.
Somethings missing or not clear?
Ask a question in our community forums or submit a support ticket.