Tutorial - Quickstart
Create a simple chatbot for booking doctor appointments. Demonstrates bot Training, Cognitive Flow and external REST API integration.
Quickstart
In the Quickstart section, you will build a chatbot that enables patients to book doctor appointments for a fictional hospital called Acme Hospital in less than 10 minutes.
1. Create your first chatbot
To create a NativeChat chatbot you will need to login to the NativeChat portal, click on the New bot button, select a language and name your bot.
2. Customize the built-in conversations
The first thing you need to do for your bot is to define a cognitive flow that consists of commands, settings, and conversations. We will leave the commands and settings for now and will focus on showing you the built-in welcome, help and restart conversations.
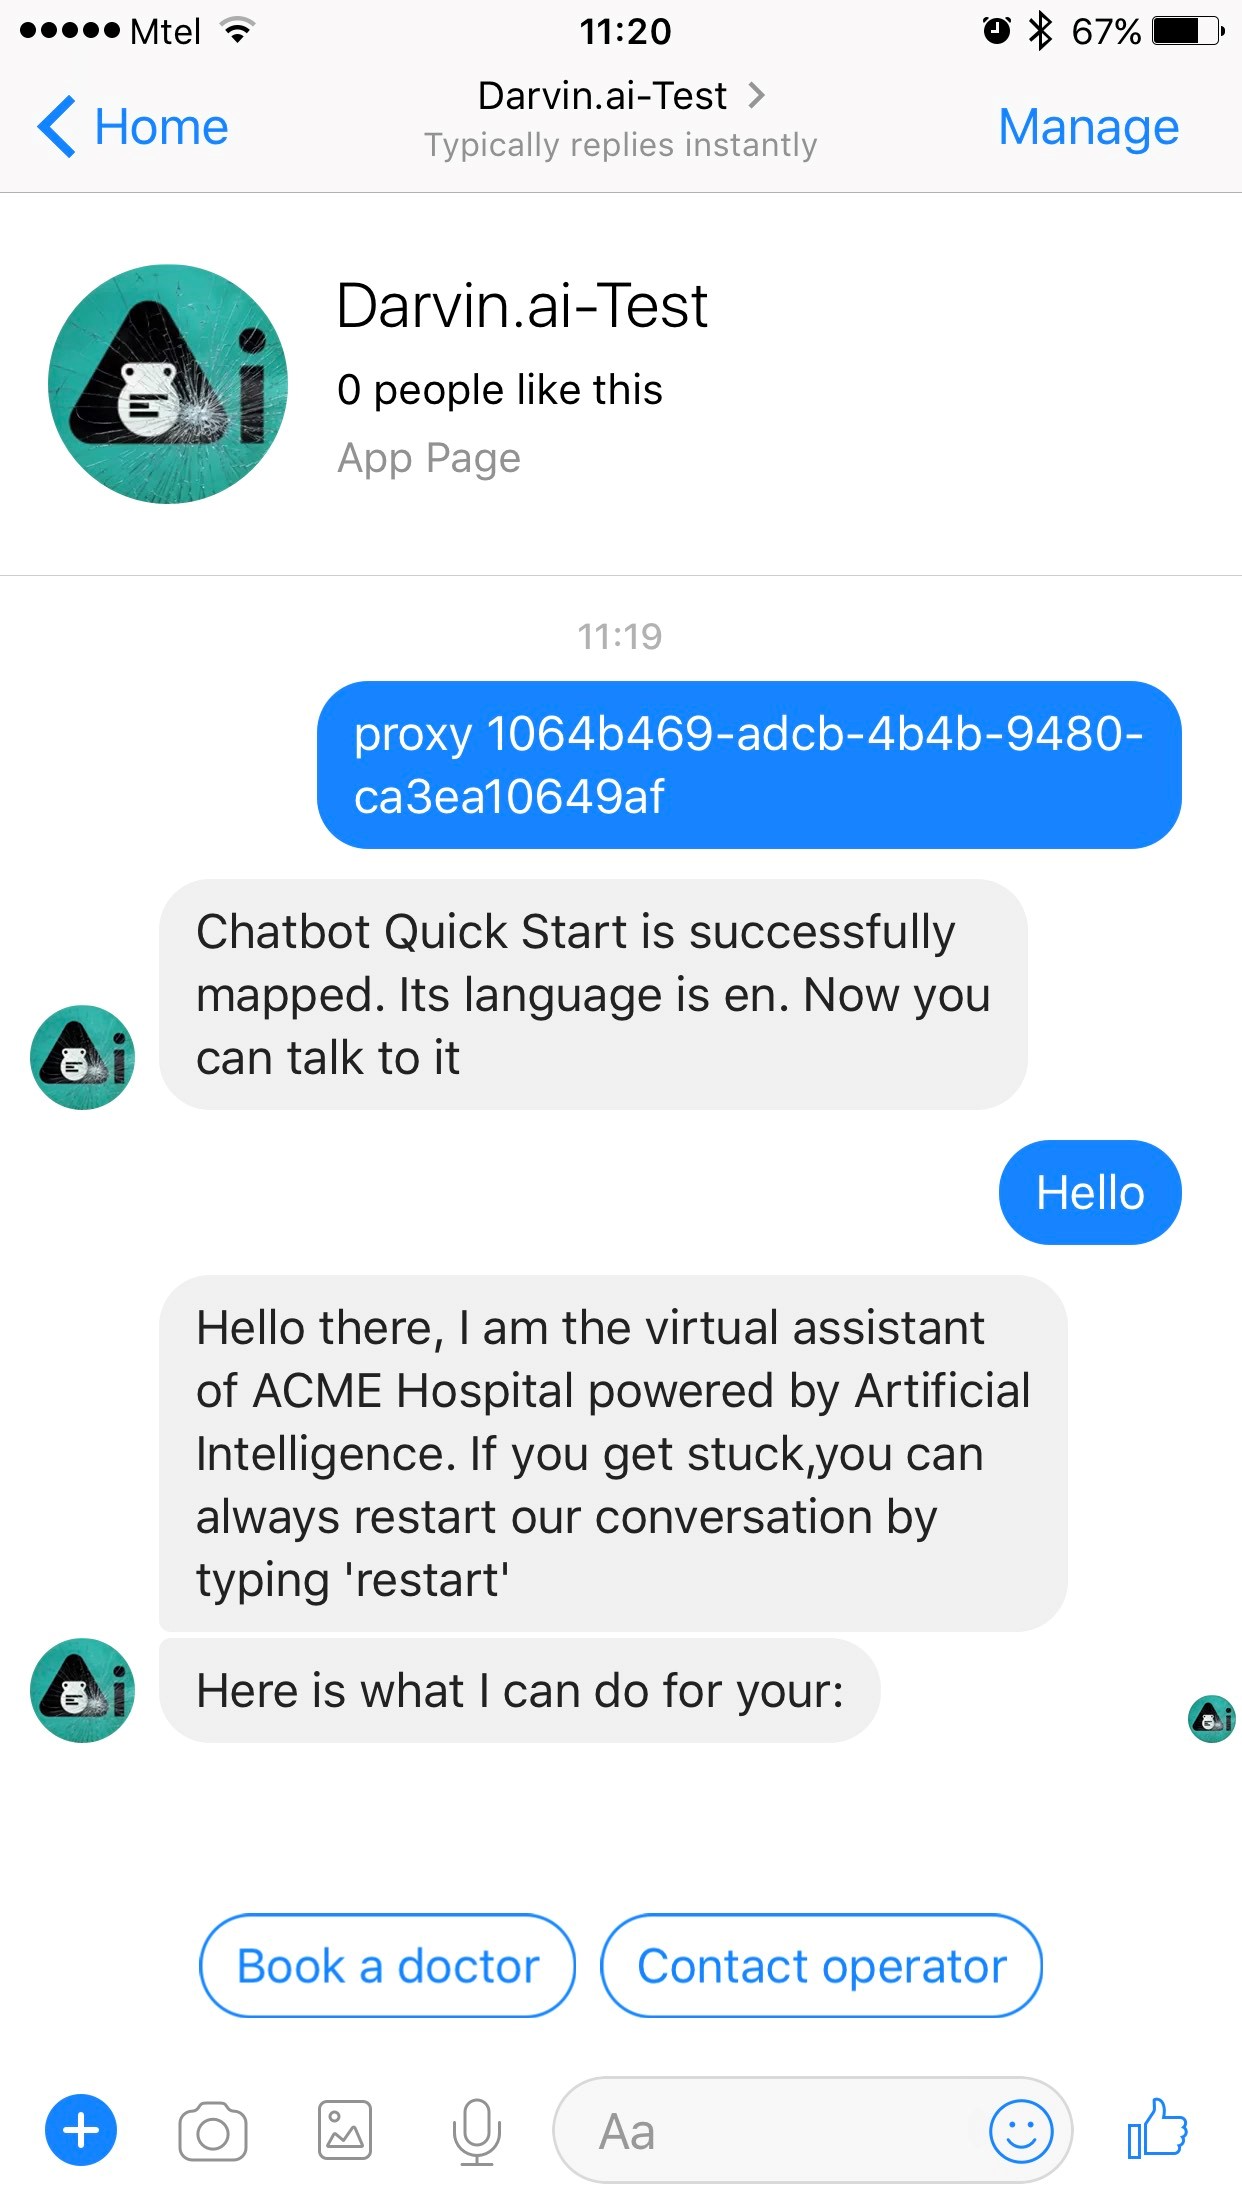
The welcome conversation is automatically displayed the first time a user talks to the bot. The welcome conversation can contain some custom messages for first time users.
The help conversation should provide information on what your bot is designed to do. The welcome conversation contains the help so that the bot instructs the users on what it can do when they first use it.
The restart conversation will restart the session with the user. It is helpful to inform the user what the restart keyword is in the help conversation so that they can restart the conversation with your bot if they get stuck.
Let’s look at these conversations.
The first is named welcome that has a message that is shown to the user when they start the chat with the bot. It then shows the steps from the help conversation to inform the user about the bot can actually do.
    "welcome": {
      "type": "support",
      "steps": [
        {
          "type": "message",
          "messages": [
            "Hello there, I am the virtual assistant of ACME Hospital powered by Artificial Intelligence."
          ]
        },
        {
          "type": "conversation",
          "conversation": "help"
        }
      ]
    }
The help conversation itself has only a message step. The message step has the actual bot message and displays 3 buttons with predefined phrases that the user can click on (the display object).
"help": {
  "type": "support",
  "steps": [
    {
      "type": "message",
      "messages": [
        [
          "Here is what I can do:"
        ]
      ],
      "display": {
        "type": "quick-reply",
        "data": [
          "Book a doctor",
          "Contact operator",
          "Restart"
        ]
      }
    }
  ]
}
And we also have the restart conversation. It is executed when the user types the restart keyword or any of the synonyms defined in the NLP training. The restart conversation has a message step to inform the user that the conversation is restarted. It also displays the steps from the help conversation to remind the user what the bot can do.
"restart": {
  "type": "support",
  "steps": [
    {
      "type": "message",
      "messages": [
        "Your conversation is restarted."
      ]
    },
    {
      "type": "conversation",
      "conversation": "help"
    }
  ]
}
Test your bot
Since it’s hard to develop a chatbot without constantly talking to it, NativeChat simplifies this process by letting you talk to your chatbot without publishing it.
In the Test panel on the right, you should be able to engage in a very simple conversation where the bot will reply with a welcome message and list of options for you.
3. Train your bot
Even though your chatbot provides options to the user, it still doesn’t know how to understand whether the user wants to book a doctor or contact an operator. For this purpose, we need to train it to understand our two conversations - Book a doctor and Contact an operator.
In our first conversation, we create a message step to ask the user what he wants to do. Once we know that, we will be able to engage the user in a separate conversation like ‘book a doctor’ that can extract the doctor name, date, time and any other field required to complete this process.
Let’s teach our chatbot how to recognize between our two different conversations by adding the following training definitions in the Conversation Triggers tab inside the Training tab:
bookDoctor conversation triggers
- Book a doctor,
- I would like to book a doctor
- Can I book a doctor for this Tuesday?
- Is doctor Burke available this Tuesday?
- Can I check doctor Burke’s schedule for this week?
- I’d like to book an appointment for Dr. Burke
contactOperator conversation triggers
- Contact support
- Can I talk to an operator?
- Would you get me in touch with a human?
- It will be great if I can talk to a person.
- Can you get me in touch with an operator?
- Forward me to an operator
Here we are training our chatbot to recognize an entity named Conversation with two values - bookDoctor and contactOperator. You can always test the bot understanding in the Test Understanding section part of Test panel. Since NativeChat is using the Wit.ai NLP engine, the bot will recognize many expressions, not just the defined in the collections. Play with the Understanding section to get a feel of what your chatbot can understand now. Further, the more you are using your chatbot, the more examples and conversations it will learn over time.
Since in the Cognitive Flow we have system defined entity conversation of entity-type Conversation, the chatbot will extract the correct value and will look for a conversation named bookDoctor and contactOperator.
Let’s create the actual Cognitive Flow for these 2 conversations.
4. Create conversation for contacting an operator
We will first start with the simpler conversation - contacting an operator.
Insert the new child contactOperator within the conversations object right after you already defined the restart conversation.
We will set the type property to goal so that the bot always returns to this conversation until all steps are completed.
"contactOperator": {
  "type": "goal",
  "display-name": "contact an operator",
  "steps": [
    {
      "type": "confirmation",
      "entity": "redirect",
      "messages": [
        "Do you want to continue the conversation with an operator?"
      ]
    },
    {
      "conditions": [
        "{{$eq redirect false}}"
      ],
      "type": "message",
      "messages": [
        "OK, I won't contact an operator yet. Let me know what you want to do next."
      ],
      "display": {
        "type": "quick-reply",
        "data": [
          "book a doctor",
          "book NST"
        ]
      }
    },
    {
      "conditions": [
        "{{$eq redirect true}}"
      ],
      "type": "message",
      "messages": [
        "I am transferring you to an operator, and I will stay silent for the next 60 minutes. If you want to get back to me, please type 'restart'."
      ]
    },
    {
      "conditions": [
        "{{$eq redirect true}}"
      ],
      "type": "command",
      "command": "stay-silent 60"
    }
  ]
}
As we have just defined a new conversation, it might be a good idea to restart your current session with the chatbot by simply typing ‘restart’. Now if you click on the Contact operator quick reply, the chatbot will kick-off the new conversation and will ask you whether you want to contact an operator and send a success message if the user agrees.
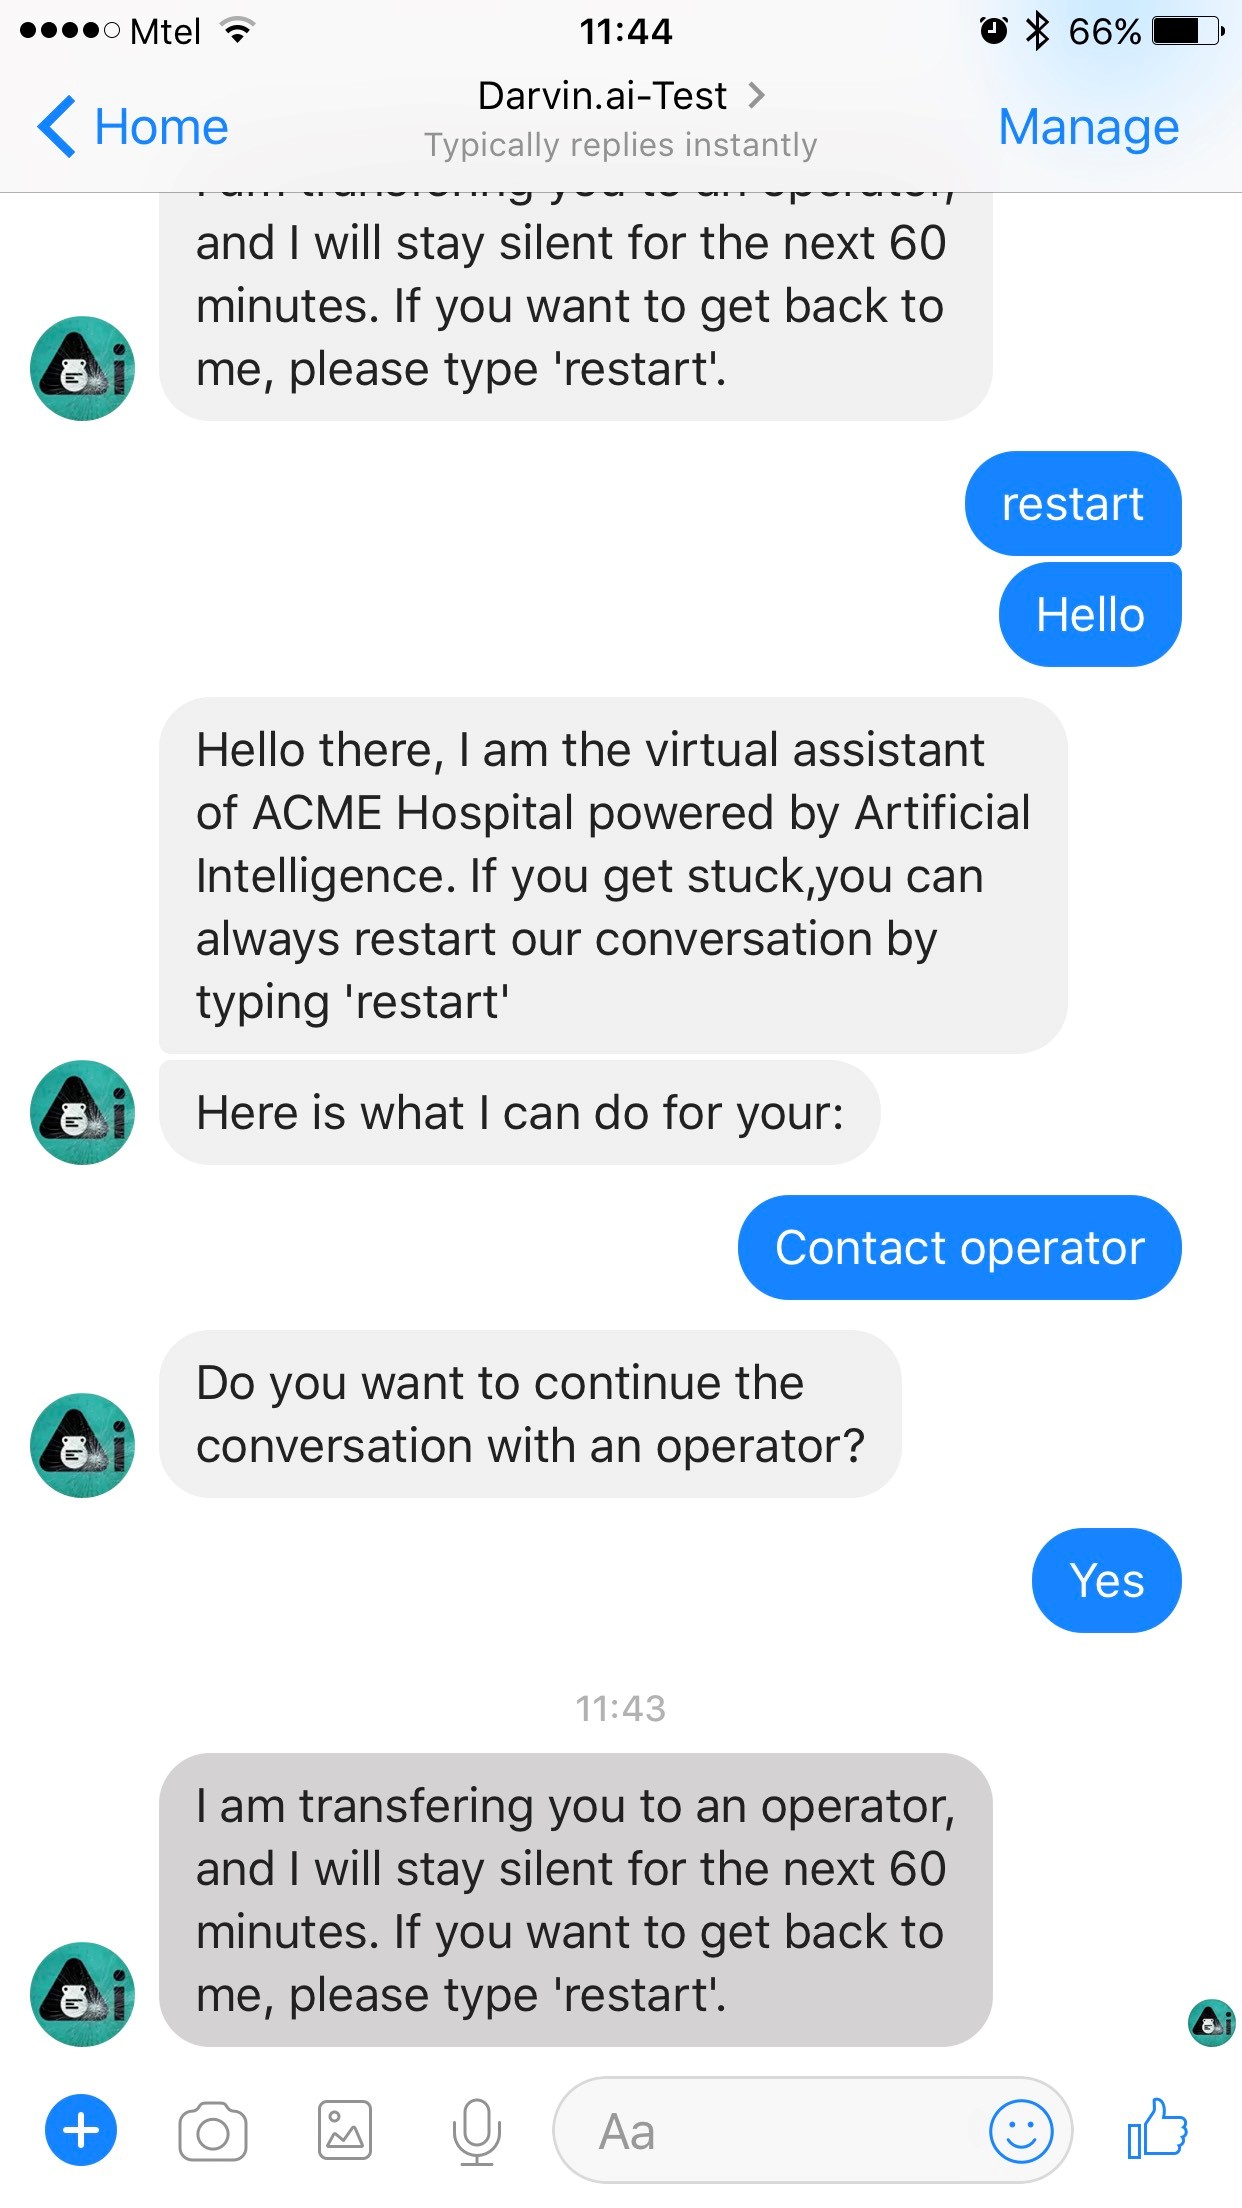
Note the “stay-silent” command step that informs the chatbot to be silent for the next 60 minutes until an operator resolves the issue. You can read more about “stay-silent” command in the Cognitive Flow section.
5. Create conversation for booking doctors
The next step is to create a conversation for booking doctor appointments.
We will set again the type: goal for this conversation. What this also does is that it clears the short-term bot memory and stores the information in the long-term memory.
Let’s assume that we have a REST API available with the following functions:
- /doctors - returns a list of doctors. We will use it to dynamically train our chatbot to know all doctors that work at the hospital.
- /doctor-days - gives available dates for a doctor.
- /doctor-hours - gives available hours for a given doctor and a date.
5.1 Train your bot to understand doctors
Before we create a conversation that will ask the user for the Doctor, Date and Time in order to create an appointment, we need to train our chatbot to understand all Doctors that are part of the company CRM. For the purpose, we need to create a new entity type in our Training definition and train it.
However, the ACME Hospital can have many Doctors that are changing, adding them manually similar to how we trained the different conversations might be a tedious job. That is why NativeChat allows dynamic training that relies on a web service call to train our model from existing data.
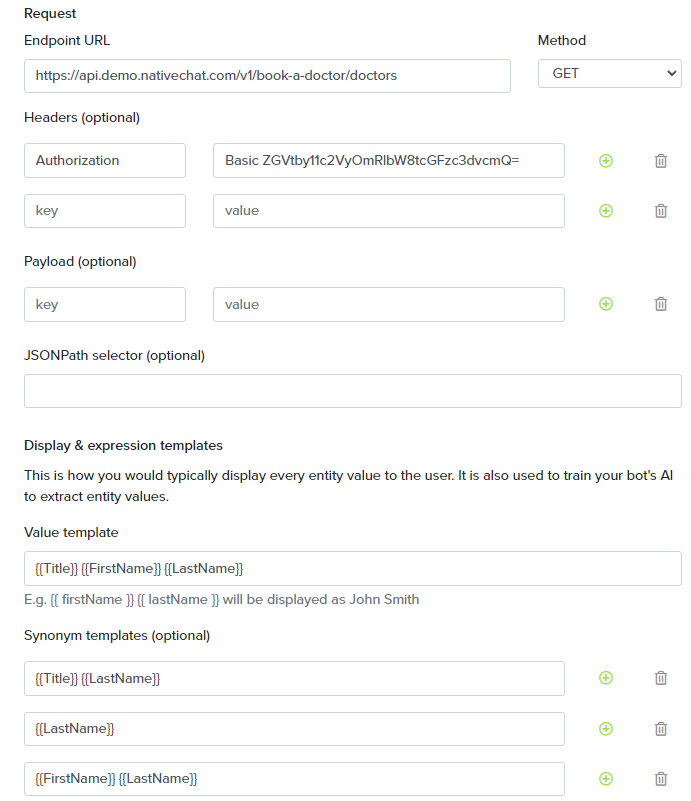
Go to the Entites tab inside the Training tab and add new entity with
- name Doctor,
- Lookup Strategy Keyword
- Training data source Dynamic
- use the sample REST API endpoint “https://api.demo.nativechat.com/v1/book-a-doctor/doctors” for request to pull all doctors.
- set the Method to “GET”
- set an Authorization header to “Basic ZGVtby11c2VyOmRlbW8tcGFzc3dvcmQ=” so that you can access the protected resource doctors.
- set the Value template to “{{Title}} {{FirstName}} {{LastName}}”
- set the Synonym templates to “{{Title}} {{LastName}}”, “{{FirstName}} {{LastName}}” and “{{LastName}}”
5.2 Ask for a doctor
Since our chatbot knows how to recognize doctors, we can define our bookDoctor conversation. Insert the new child “bookDoctor” within the “conversations” object right after you already defined contactOperator conversation.
"bookDoctor": {
  "type": "goal",
  "display-name": "book a doctor",
  "steps": [
    {
      "type": "question",
      "entity": "doctor",
      "entity-type": "Doctor",
      "messages": [
        "What's the name of the doctor that you want to see?"
      ],
      "reactions": {
        "acknowledgements": [
          "I understand that you want to meet with {{doctor}}."
        ],
        "ambiguities": [
          "I am not sure I understand the doctor you want to meet. Can you select one of the following?"
        ],
        "validations": [
          {
            "type": "custom",
            "parameters": {
              "data-source": {
                    "endpoint": "https://api.demo.nativechat.com/v1/book-a-doctor/doctor-days?doctorId={{$encodeURI doctor.ExternalId}}",
                    "method": "GET",
                    "headers": {
                      "Authorization": "Basic ZGVtby11c2VyOmRlbW8tcGFzc3dvcmQ="
                    }
              },
              "condition": "{{$ne \"[]\" ($json _response)}}"
            },
            "error-message": [
              "Unfortunately, {{doctor}} is not available."
            ]
          }
        ]
      },
      "display": {
        "type": "quick-reply"
      }
    }
  ]
}
Note that we are using the entity-type Doctor that we just trained in the previous step, and thus you can use the following notation {{entity.Property}} where Entity is the name of your entity in each step, and Property is a custom property retrieved from your database at the time of the training.
To simplify things for the user, we are giving options to the user by using quick replies that will be pulled from a service.
We have also created a custom validation to ensure that the selected doctor accepts appointments.
Here is how it looks:
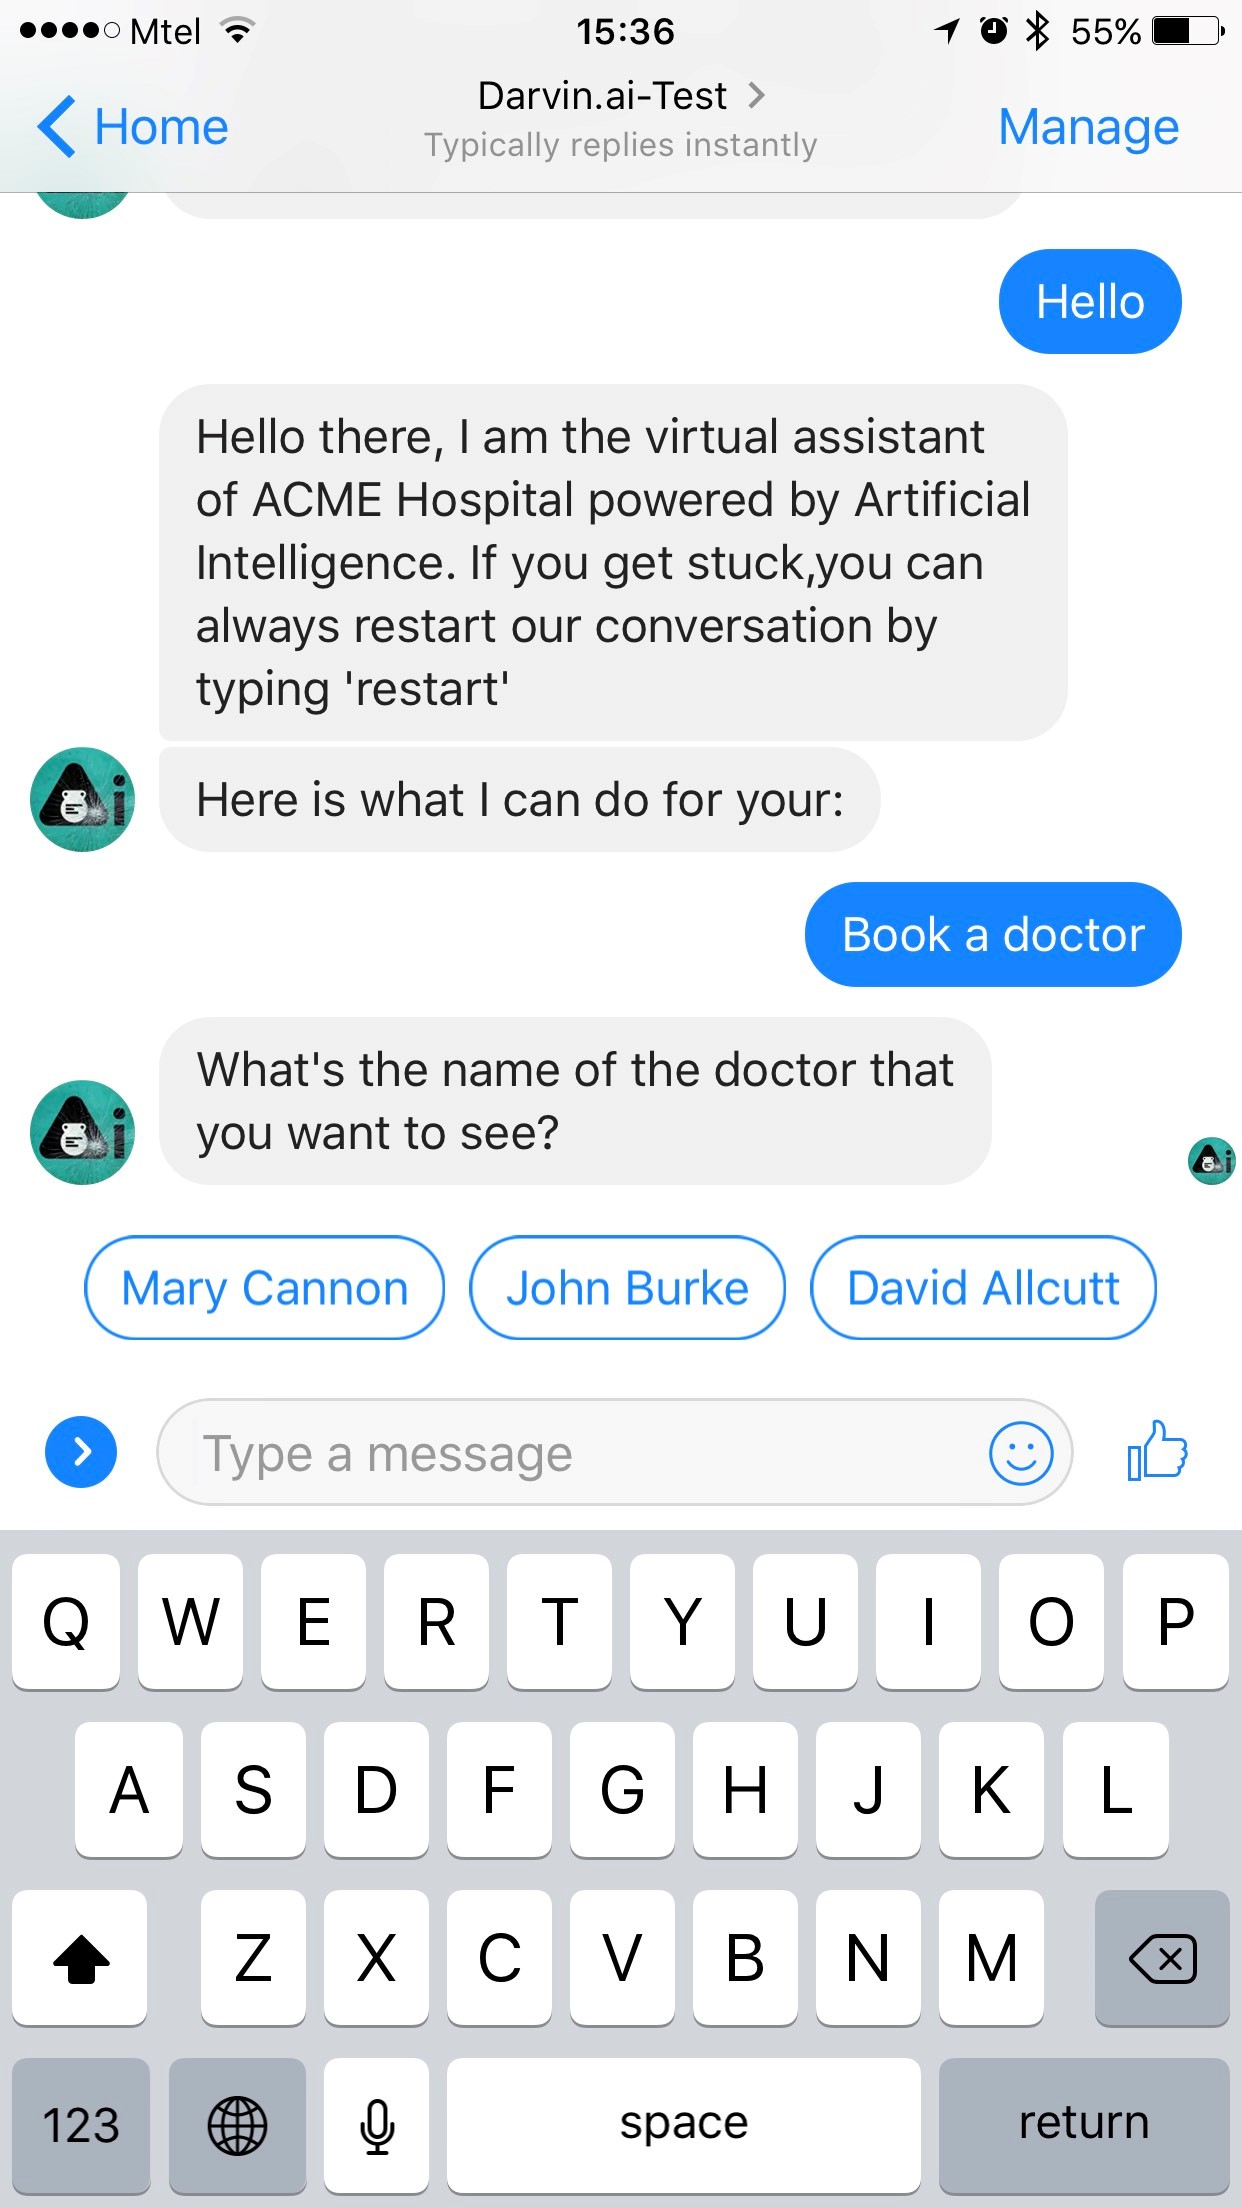
Try the following expressions as a beginning of the conversation with your chatbot to see how it works.
- Hello
- I would like to book doctor Burke
- Is doctor Alcutt available?
Don’t forget to restart your session every time you make changes to the cognitive flow or the training definitions.
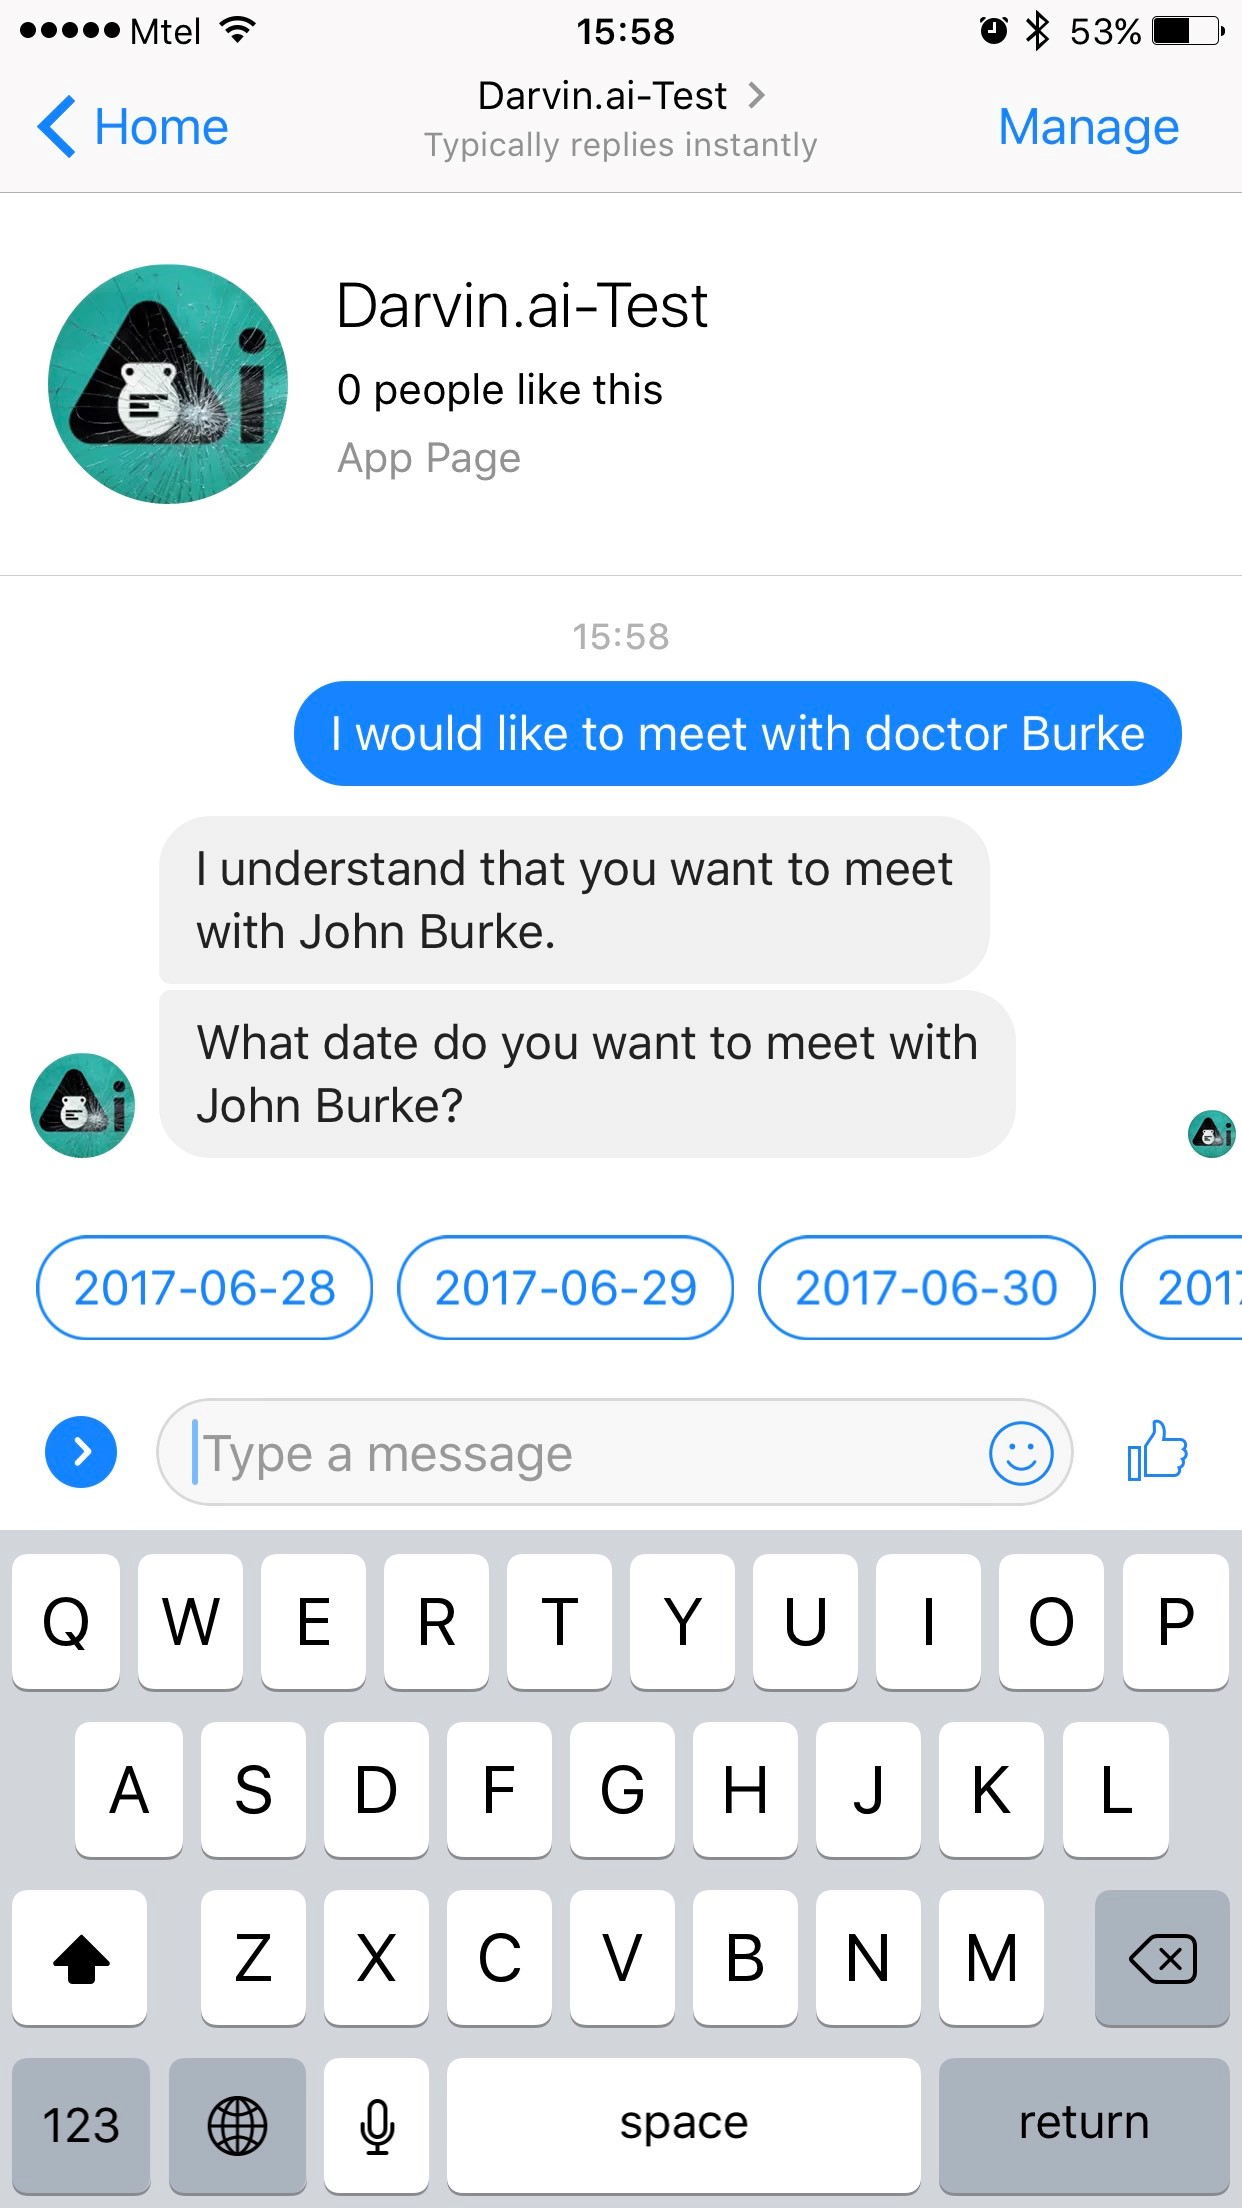
5.3 Ask for a date
Our next step is to retrieve a date for the appointment. We will create a new question step suggesting dates for which our doctor is available. Note that since the doctor is already known to your chatbot, you can use the {{entity.Property}} expression to make your conversation contextual.
Insert the new child object within the “bookDoctor” conversation right after your already defined doctor step.
{
  "type": "question",
  "entity": "date",
  "entity-type": "Date",
  "messages": [
    "What date do you want to meet with {{doctor}}?"
  ],
  "reactions": {
    "validations": [
      {
        "type": "custom",
        "parameters": {
          "data-source": {
            "endpoint": "https://api.demo.nativechat.com/v1/book-a-doctor/doctor-days?doctorId={{$encodeURI doctor.ExternalId}}",
            "method": "GET",
            "headers": {
              "Authorization": "Basic ZGVtby11c2VyOmRlbW8tcGFzc3dvcmQ="
            }
          },
          "condition": "{{$in ($date date 'YYYY-MM-DD') _response}}"
        },
        "error-message": [
          "Unfortunately, {{doctor}} is not available on {{date}}."
        ]
      }
    ]
  },
  "display": {
    "type": "quick-reply",
    "data-source": {
      "endpoint": "https://api.demo.nativechat.com/v1/book-a-doctor/doctor-days?doctorId={{$encodeURI doctor.ExternalId}}",
      "method": "GET",
      "headers": {
        "Authorization": "Basic ZGVtby11c2VyOmRlbW8tcGFzc3dvcmQ="
      }
    }
  }
}
This is how the chat will look like when asking for dates:
5.4 Ask for time
We will use the /doctor-hours function to retrieve the available time slots for our doctor and date.
Insert the new step as a child object within the “bookDoctor” conversation right after your already defined date step.
{
  "type": "question",
  "entity": "time",
  "entity-type": "Time",
  "messages": [
    "What time do you want to meet {{doctor}} on {{date}}?"
  ],
  "reactions": {
    "validations": [
      {
        "type": "custom",
        "parameters": {
          "data-source": {
            "endpoint": "https://api.demo.nativechat.com/v1/book-a-doctor/doctor-hours?doctorId={{$encodeURI doctor.ExternalId}}&date={{$encodeURI date}}",
            "method": "GET",
            "headers": {
              "Authorization": "Basic ZGVtby11c2VyOmRlbW8tcGFzc3dvcmQ="
            }
          },
          "condition": "{{$in time _response}}"
        },
        "error-message": [
          "Unfortunately, {{doctor}} is not available on {{date}} at {{time}}."
        ]
      }
    ]
  },
  "display": {
    "type": "quick-reply",
    "data-source": {
      "endpoint": "https://api.demo.nativechat.com/v1/book-a-doctor/doctor-hours?doctorId={{$encodeURI doctor.ExternalId}}&date={{$encodeURI date}}",
      "method": "GET",
      "headers": {
        "Authorization": "Basic ZGVtby11c2VyOmRlbW8tcGFzc3dvcmQ="
      }
    }
  }
}
5.5 Ask for patient’s name
The final step is to ask the user for his name before we can save the appointment.
Insert the new step as child object within the “bookDoctor” conversation right after your already defined time step.
{
  "type": "question",
  "is-explicit": true,
  "entity": "contactName",
  "entity-type": "Text",
  "messages": [
    "What are your first and last names?"
  ],
  "reactions": {
    "validations": [
      {
        "type": "regex",
        "parameters": {
          "value": "(\\w.+\\s).+"
        },
        "error-message": [
          "Please enter your first and last name."
        ]
      }
    ]
  }
}
5.6 Save the appointment
To save the appointments in our collection, we will use two steps.
Entities confirmation step to ask the user to confirm the information.
Insert the new child object within the “bookDoctor” conversation right after your already defined contactName step.
  {
    "type": "entities-confirmation",
    "entity": "confirmBookDoctor",
    "entities": [
      "doctor",
      "date",
      "time"
    ],
    "messages": [
      [
        "I am booking you an appointment for {{doctor}} on {{date}} at {{time}}.",
        "Please, confirm or select the value that you want to change."
      ]
    ]
  }
And finally, a Webhook step to save the appointment in an external service using a web service call.
  {
    "conditions": [
      "{{$eq confirmBookDoctor true}}"
    ],
    "type": "webhook",
    "messages": [
      "Congratulations. You have an appointment with {{doctor}} for {{date}} at {{time}}. See you soon!"
    ],
    "data-source": {
      "endpoint": "https://api.demo.nativechat.com/v1/book-a-doctor/appointment",
      "method": "POST",
      "headers": {
        "Authorization": "Basic ZGVtby11c2VyOmRlbW8tcGFzc3dvcmQ="
      },
      "payload": {
        "DoctorID": "{{doctor.ExternalId}}",
        "PatientName": "{{contactName}}",
        "Date": "{{date}}",
        "Time": "{{time}}"
      }
    }
  }
Congratulations, you just created your first bot.
Somethings missing or not clear?
Ask a question in our community forums or submit a support ticket.