Reply Templates
Learn how to display reply suggestions with predefined lists of answers that chatbot users can pick from.
NativeChat provides you a way to give users a list of predefined answers they can pick from. This helps them understand what they are being asked for and also limits the possibility of error when entering free text replies.
There are several different ways to display these predefined replies to the users.
The type property of the display object defines how to display the options. Supported values are:
quick-reply- displays the options as buttons in the chat UIlocation-picker- displays a prompt for locationdate-picker- displays a calendar for picking a datesingle-select- displays the options in a dialog window as a list of items. Users can select only one item from the list.multi-select- displays the options in a dialog window as a list of items. Users can select one or more items from the list.carousel- displays the available options in a carousel view inside the chat
quick-reply
Quick replies are shown as buttons in the chat UI after the step’s message. When the user clicks on a button, the text of the button is passed to the bot as if the user has typed it in the message box.
Here are two examples:
Only 5 quick replies can be shown at a time. If the list of quick replies you defined in the Cognitive flow is with more than 5, NativeChat will show the system button “Next 5” / “Prev 5” that will show additional / previous 5 replies to the user. It works as a pagination in standard UIs. You can change the label of the system buttons in the Settings part of the Cognitive Flow.
You can define the list of quick replies shown to the users by one of the following ways.
From static array of quick replies
Array of strings
{
  "steps": [
    {
      "messages": [
        "Here is what I can do for you:"
      ],
      "display": {
        "type": "quick-reply",
        "data": [
          "Book a doctor",
          "Contact operator",
          "Restart"
        ]
      }
    }
  ]
}
Array of objects
{
"steps": [
{
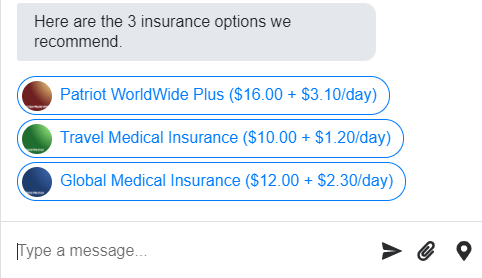
"messages": [
"Here are the 3 insurance options we recommend."
],
"display": {
"type": "quick-reply",
"data": [
{
"title": "Patriot WorldWide Plus ($16.00 + $3.10/day)",
"value": "Patriot WorldWide Plus",
"image": "https://raw.githubusercontent.com/nativechat/samples/main/InsuranceAgent/en/images/patriot.png"
},
{
"title": "Travel Medical Insurance ($10.00 + $1.20/day)",
"value": "Travel Medical Insurance",
"image": "https://raw.githubusercontent.com/nativechat/samples/main/InsuranceAgent/en/images/travel-medical.png"
},
{
"title": "Global Medical Insurance ($12.00 + $2.30/day)",
"value": "Global Medical Insurance",
"image": "https://raw.githubusercontent.com/nativechat/samples/main/InsuranceAgent/en/images/global-medical.png"
}
]
}
}
]
}
| Name | Type | Required | Description |
|---|---|---|---|
data |
array | No | Default: none a) An array of strings b) Array of objects with title, value and image properties.Each item of the array is shown as a quick reply button. |
If you want to display a quick reply with an image and/or markdown formatted text, you can use the following template to specify quick replies data property as an array of objects:
| Name | Type | Required | Description |
|---|---|---|---|
title |
string | Yes | Default: none The text in the list for each option. |
image |
string | No | Default: none URL of an image file. |
value |
string | No | Default: same as the value of the title property. If you want to pass a value to the bot that is different from one shown as the title of the selected option. |
Understanding title vs value.
It is important to understand that the value returned from the selection must be matched to the items defined in the Entity (in the training tab). So, if you change the title to be:
"title": "Office in {{city}}"
Then selecting Office in Berlin will fail, as the City Entity doesn’t contain such record.
In this case, you need to use the value, which should provide the property that the chatbot could match to, like this:
{
  "title": "Office in {{city}}",
  "value": "{{city}}"
}
From the values of custom entities
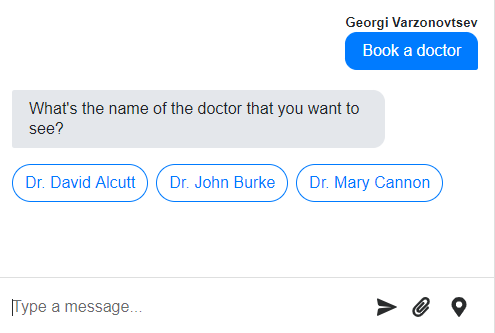
If you are asking about a custom entity (for example, Doctor) the quick replies can be inferred from the training data of that entity.
For example, if you have a Doctors custom entity type with these values:
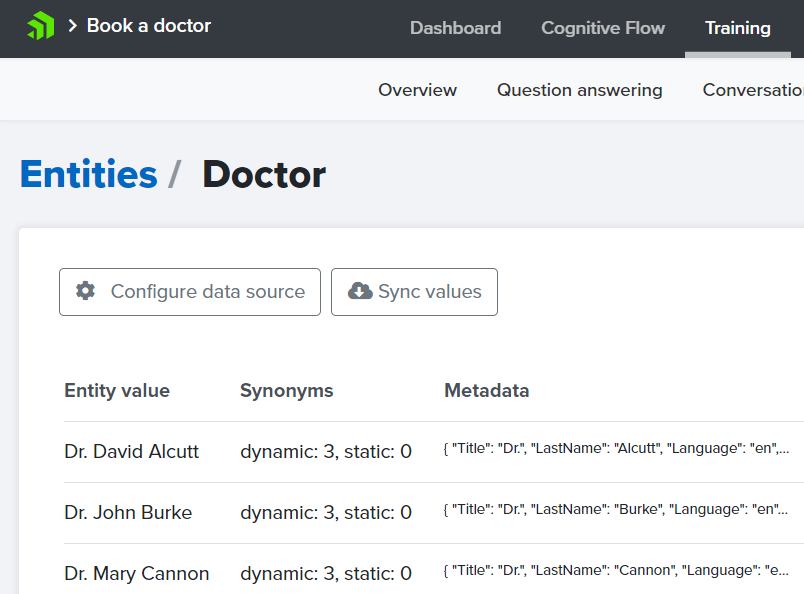
you can use this Cognitive flow definition
{
  "steps": [
    {
      "type": "question",
      "entity": "selectedDoctor",
      "entity-type": "Doctors",
      "messages": [
        "What's the name of the doctor that you want to see?"
      ],
      "display": {
        "type": "quick-reply"
      }
    }
  ]
}
that will render these quick replies:
From a webhook response
You can request the values of quick replies from external service.
For example, if you have API endpoint that returns an array of Doctor objects (each doctor has FirstName, LastName, Title etc.), you can define the following question step and quick reply display.
{
  "steps": [
    {
      "type": "question",
      "entity": "selectedDoctor",
      "entity-type": "Doctor",
      "messages": [
        "What's the name of the doctor that you want to see?"
      ],
      "display": {
        "type": "quick-reply",
        "data-source": {
          "endpoint": "https://yourwebsite.com/GetDoctors",
          "method": "GET",
          "selector": "$.Result[:]"
        },
        "template": "{{Title}} {{FirstName}} {{LastName}}"
      }
    }
  ]
}
You can also use a template that transforms the API endpoint return value into an array of objects with title, value and image properties.
{
  "steps": [
    {
      "type": "question",
      "entity": "insurancePlan",
      "entity-type": "InsurancePlan",
      "messages": [
          "Here are the 3 insurance options we recommend."
      ],
      "display": {
        "type": "quick-reply",
        "data-source": {
          "endpoint": "https://api.demo.nativechat.com/v1/insurance-agent/get-recommendations",
          "method": "GET",
          "headers": {
            "Authorization": "Basic ZGVtby11c2VyOmRlbW8tcGFzc3dvcmQ=",
          },
        },
        "template": {
          "title": "{{Name}} ({{$currency FlatFee 'USD'}} + {{$currency DailyPrice 'USD'}}/day)",
          "image": "{{Image}}",
          "value": "{{Name}}"
        }
      }
    }
  ]
}
Check the description of data-source for more information.
From the values of an entity stored in Bot Memory
You can use a custom entity that is already defined in the conversation context.
{
  "steps": [
    {
      "type": "question",
      "entity": "selectedDoctor",
      "entity-type": "Doctor",
      "messages": [
        "What's the name of the doctor that you want to see?"
      ],
      "display": {
        "type": "quick-reply",
        "data-source": {
          "entity": "allDoctors"
        },
        "template": "{{Title}} {{FirstName}} {{LastName}}"
      }
    }
  ]
}
Check the description of data-source property for more information.
location-picker
Displays a prompt for the user to pick a location.
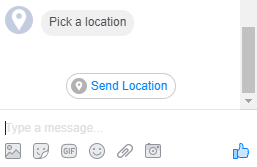
{
  "steps": [
    {
      ...
      "display": {
        "type": "location-picker",
        "title": "Pick a location",
        "button-text": "Submit"
      }
    }
  ]
}
| Name | Type | Required | Description |
|---|---|---|---|
title |
string | Yes | Default: “Open” Тhe name of the button shown in the chat. |
button-text |
string | No | Default: “Submit” Тhe name of the submit button in the Location picker dialog. |
date-picker (MS Teams, LINE and Web)
Displays a date picker for the user to pick a date.
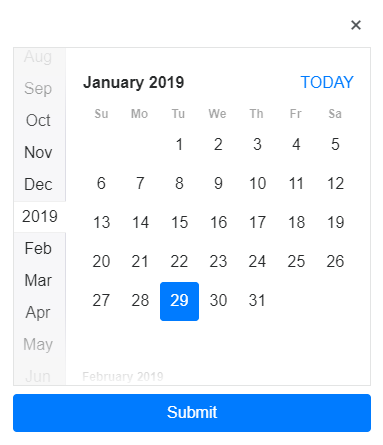
{
  "steps": [
    {
      ...
      "display": {
        "type": "date-picker",
        "title": "Pick a date",
        "button-text": "Submit"
      }
    }
}
| Name | Type | Required | Description |
|---|---|---|---|
title |
string | Yes | Default: “Open” Тhe name of the button shown in the chat. |
button-text |
string | No | Default: “Submit” Тhe name of the submit button in the Date picker dialog. |
single-select
Displays a list of options to the user where they can pick only one of these. Single select UI is presented in a dialog window and can visualize both text and images. It is suitable for longer list (e.g. Countries, Cities, etc.) where other quick reply types won’t be that efficient.
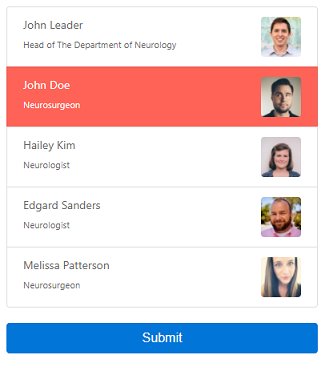
{
  "steps": [
    {
      ...
      "display": {
        "type": "single-select",
        "data-source": {
          "endpoint": "https://yourwebsite.com/GetDoctors",
          "method": "GET"
        },
        "title": "Choose a doctor",
        "button-text": "Submit",
        "template": {
          "title": "{{FirstName}} {{LastName}}",
          "subtitle": "{{Specialty}}",
          "image": "{{Image}}"
        }
      }
    }
  ]
}
Single select (and multi select) also supports filtering. You can add a type-in filter by setting has-filter to true.
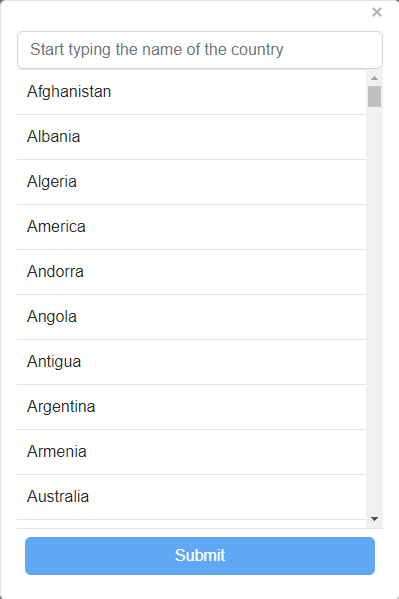
{
  "steps": [
    {
      ...
      "display": {
        "type": "single-select",
        "data-source": {
          "endpoint": "https://yourwebsite.com/GetCountries",
          "method": "GET"
        },
        "title": "Choose a country",
        "has-filter": true,
        "filter-placeholder-text": "Start typing the name of the country"
      }
    }
  ]
}
| Name | Type | Required | Description |
|---|---|---|---|
type |
string | No | single-select |
data |
array | No | Default: none Static data for the options in the list. Learn more |
data-source |
object | No | Default: none Populate data for the list from external REST API. Learn more |
title |
string | Yes | Default: none Тhe text of the button shown in the chat that opens the single select dialog window. |
button-text |
string | No | Default: “Submit” Тhe text of the submit button in the dialog window. |
template |
object | No | Default: none Template for formatting the list options. |
has-filter |
boolean | No | Default: false When true a type-in filter is added to the top of the list with items so that user can easily navigate through the items. |
filter-placeholder-text |
string | No | Default: none Placeholder text for the filter input. Only applicable when has-filter is set to true. |
The template object has these properties:
| Name | Type | Required | Description |
|---|---|---|---|
title |
string | No* | Default: if the array is composed of strings, the value of the string is displayed directly as the the option text. The text in the list for each option. |
subtitle |
string | No | Default: none Second line of text for each option. |
image |
string | No | Default: none URL of an image file. |
value |
string | No | Default: same as the value of the title property. If you want to pass a value to the bot that is different from one shown as the title of the selected option. |
multi-select (MS Teams and Web)
Displays a list of options to the user where they can select one or more items. The multi-select UI is presented in a dialog window and can visualize both text and images. This template is suitable for longer list of items (e.g. Countries, Cities, etc.) where the user needs to select one or more options.
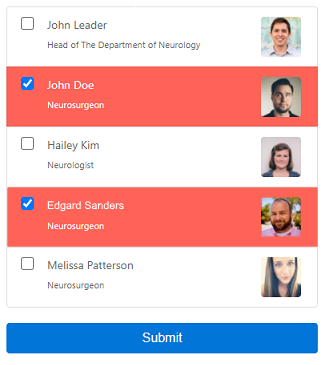
{
  "steps": [
    {
      ...
      "display": {
        "type": "multi-select",
        "data-source": {
          "endpoint": "https://yourwebsite.com/GetDoctors",
          "method": "GET"
        },
        "title": "Choose one or more doctors",
        "button-text": "Submit",
        "template": {
          "title": "{{FirstName}} {{LastName}}",
          "subtitle": "{{Specialty}}",
          "value": "{{LastName}}",
          "image": "{{Image}}"
        }
      }
    }
  ]
}
| Name | Type | Required | Description |
|---|---|---|---|
type |
string | No | multi-select |
data |
array | No | Default: none Static data for the options in the list. Learn more |
data-source |
object | No | Default: none Populate data for the list from external REST API. Learn more |
title |
string | Yes | Default: none Тhe text of the button shown in the chat that opens the single select dialog window. |
button-text |
string | No | Default: “Submit” Тhe text of the submit button in the dialog window. |
template |
object | No | Default: none Template for formatting the list options. |
has-filter |
boolean | No | Default: false When true a type-in filter is added to the top of the list with items so that user can easily navigate through the items. |
filter-placeholder-text |
string | No | Default: none Placeholder text for the filter input. Only applicable when has-filter is set to true. |
The template object has the following properties:
| Name | Type | Required | Description |
|---|---|---|---|
title |
string | No* | Default: if the array is composed of strings, the value of the string is displayed directly as the the option text. The text in the list for each option. |
subtitle |
string | No | Default: none Second line of text for each option. |
image |
string | No | Default: none URL of an image file. |
value |
string | No | Default: same as the value of the title property. If you want to pass a value to the bot that is different from one shown as the title of the selected option. |
carousel (Facebook, MS Teams, LINE and Web)
Displays the options in a carousel view inside the chat.
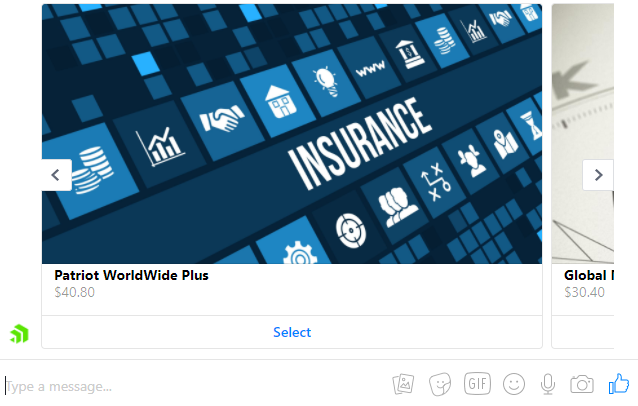
{
  "steps": [
    {
      ...
      "display": {
        "type": "carousel",
        "data-source": {
          "endpoint": "https://yourwebsite.com/GetInsurances",
          "method": "GET"
        },
        "title": "Pick an insurance plan",
        "button-text": "Select",
        "template": {
          "title": "{{Name}}",
          "subtitle": "{{$currency Price 'USD'}}",
          "image": "{{Image}}"
        }
      }
    }
  ]
}
| Name | Type | Required | Description |
|---|---|---|---|
button-text |
string | No | Default: “Select” Тhe text of the button of each card that is used for selection. |
template |
object | Yes | Define the content shown in a single carousel item. |
title |
string | Yes | Required fallback for Viber. In Viber there is no carousel UI support and thus the NativeChat carousel is displayed as single-select. Title is the text of the button that opens a picker with the carousel options in a browser window. |
The template object has these properties:
| Name | Type | Required | Description |
|---|---|---|---|
title |
string | Yes | Default: none The title text of a card in the carousel. |
subtitle |
string | No | Default: none The text shown under the title of the carousel item. |
image |
string | Yes | Default: none The URL of a image for that carousel item. |
data (optional)
Provides a static list of options to show the user.
{
  "steps": [
    {
      "type": "question",
      "entity": "selectedDoctor",
      "entity-type": "Doctor",
      "messages": [
        "What's the name of the doctor that you want to see?"
      ],
      "display": {
        "type": "quick-reply",
        "data": [
          "Dr. John Burke",
          "Dr. Stan Smith",
          "Dr. Ivo Karlovic"
        ]
      }
    }
  ]
}
data-source (optional)
You can retrieve data from a web service or use an existing entity from the context to provide a list of options to the user.
API endpoint request
Get the list of options from a REST API endpoint response.
{
  "steps": [
    {
      "type": "question",
      "entity": "selectedDoctor",
      "entity-type": "Doctor",
      "messages": [
        "What's the name of the doctor that you want to see?"
      ],
      "display": {
        "type": "quick-reply",
        "data-source": {
          "endpoint": "https://yourwebsite.com/GetDoctors",
          "method": "GET",
          "selector": "$.Result[:]"
        },
        "template": "{{Title}} {{FirstName}} {{LastName}}"
      }
    }
  ]
}
Check the datasource article for more information
Existing entity
You can use a custom entity that is already defined in the context as a data source. If the entity is not an array of strings, you can use the selector and template properties to construct the list of options that will be displayed to the user.
Let’s say you already have a webhookData entity in the context where you have stored the result from an external API call.
{
  "webhookData": {
    "Doctors": [
      {
        "Title": "Dr.",
        "FirstName": "John",
        "LastName": "Burke"
      },
       {
        "Title": "Dr.",
        "FirstName": "Marry",
        "LastName": "Cannon"
      }
    ],
    "Hospitals":[]
  }
}
Since the webhookData entity is an object, you have to use a selector to get the Doctors array from it. After that using the template property you can format the text of the quick reply options.
{
  "steps": [
    {
      "type": "question",
      "entity": "selectedDoctor",
      "entity-type": "Doctor",
      "messages": [
        "What's the name of the doctor that you want to see?"
      ],
      "display": {
        "type": "quick-reply",
        "data-source": {
          "entity": "webhookData",
          "selector": "$.Doctors[:]"
        },
        "template": "{{Title}} {{FirstName}} {{LastName}}"
      }
    }
  ]
}
| Name | Type | Required | Description |
|---|---|---|---|
data-source |
object | No | Default: none The title text of a card in the carousel. |
entity |
string | No | Default: none The name of the entity that has already value stored in Bot Memory. |
selector |
string | No | Default: none If the context entity is not an array, you can use the selector property within the data-source to define a JSONPath expression to extract the array. We recommend you to create your JSONPath expressions using the jsonpath.com. |
template |
string | No | Default: none Provide a syntax for displaying the options to the user, e.g. {{FirstName}}. This is the handlebars syntax, same as Formatting for messages. |
Somethings missing or not clear?
Ask a question in our community forums or submit a support ticket.